TS: AC Modding Tool Guide
This tool allows the sharing of partially modified data through the Workshop.
Using this tool, you can change some values of the game data.
Caution
If values such as movement distance or sight range increase significantly, the game client's performance may be affected due to enemy AI pathfinding calculations and movement processing. This could result in abnormal termination or significantly slowed gameplay.
1. TS: AC Modding Tool Installation
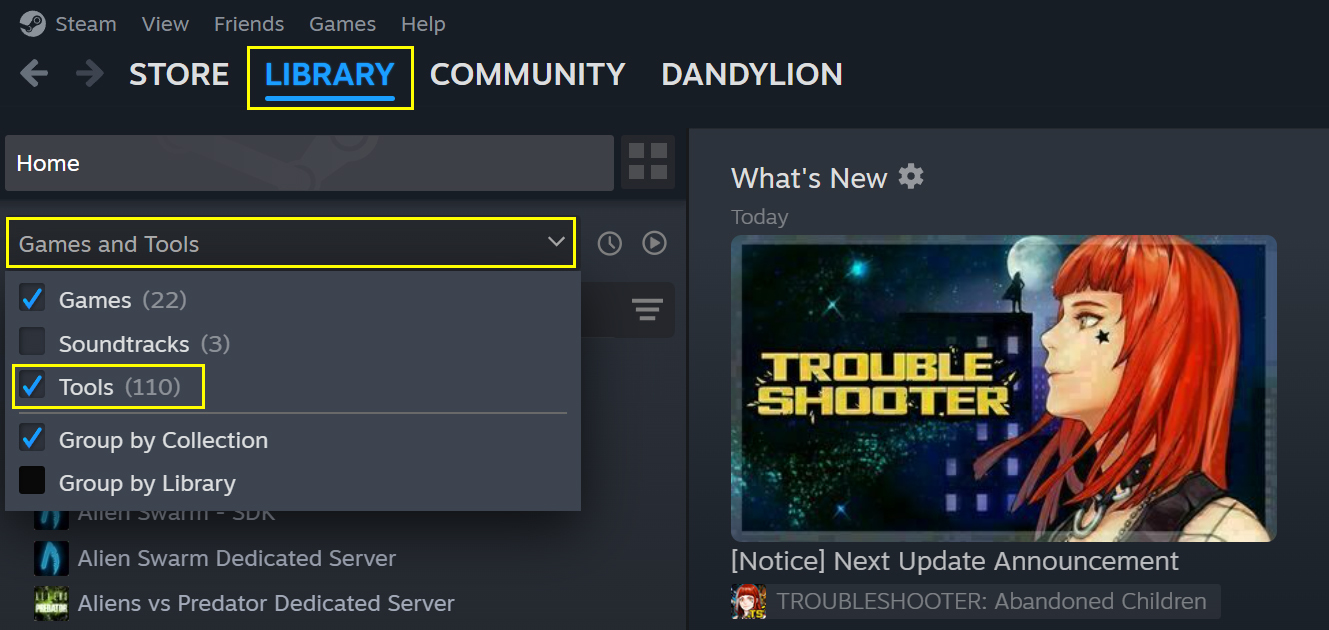
- Click the "Library" tab at the top of the Steam client.
- Click "Games and Tools" in the top left corner.
- Enable the checkbox for "Tools" in the drop-down list.
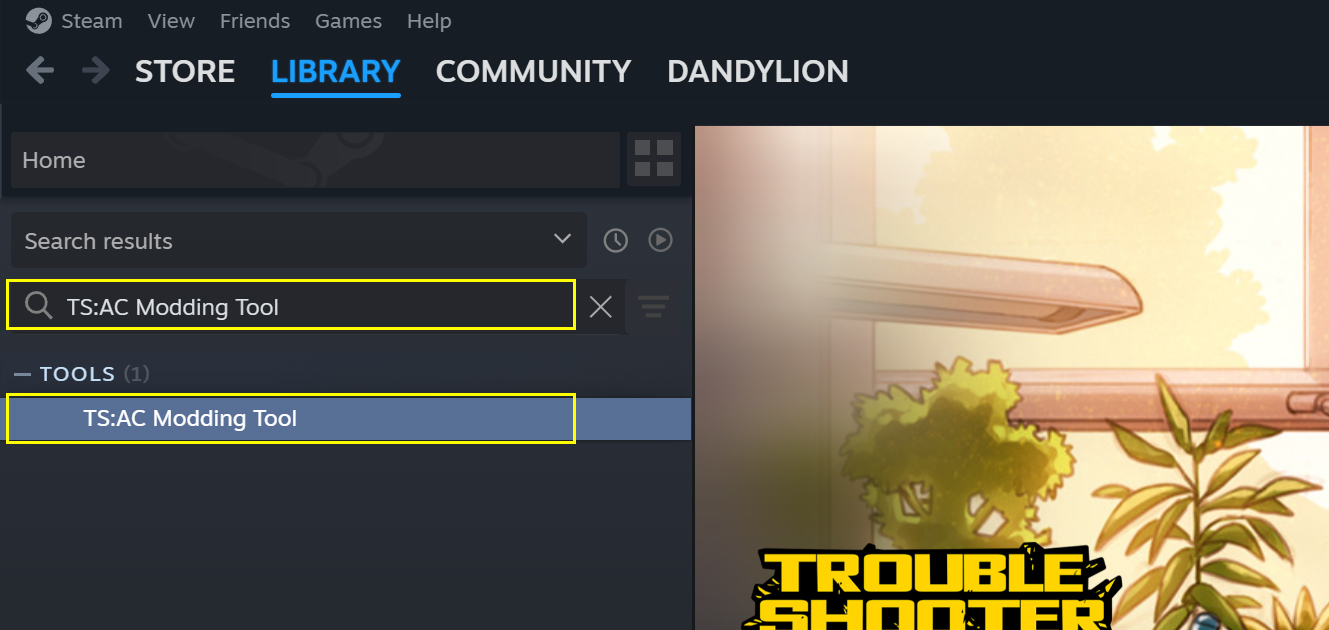
- Search for "TS: AC Modding Tool" in the search bar.
- Select "TS: AC Modding Tool" under the Tools section in the list below and install it.
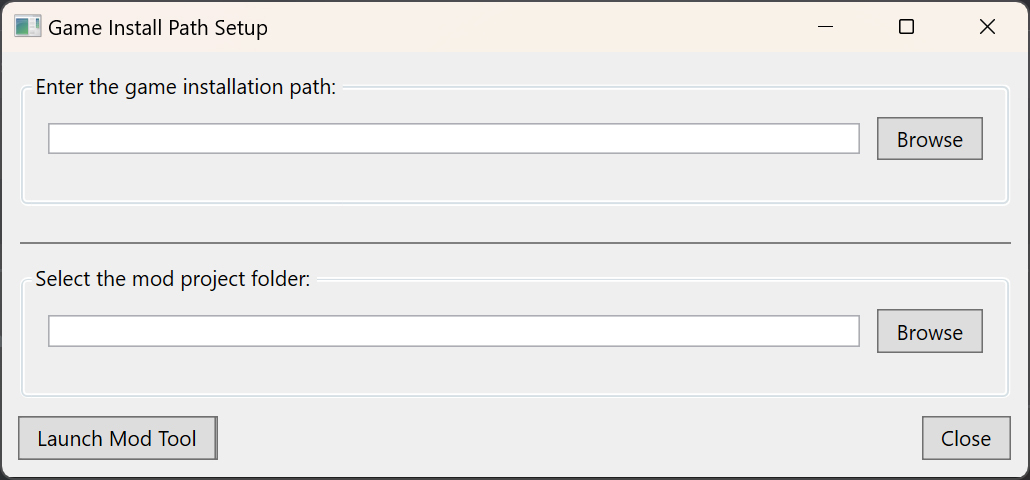
- When you click "Install" of "TS: AC Modding Tool", Game Install Path Setup window will appear.
- Specify the installation path of the game and the folder where the modding data will be stored.
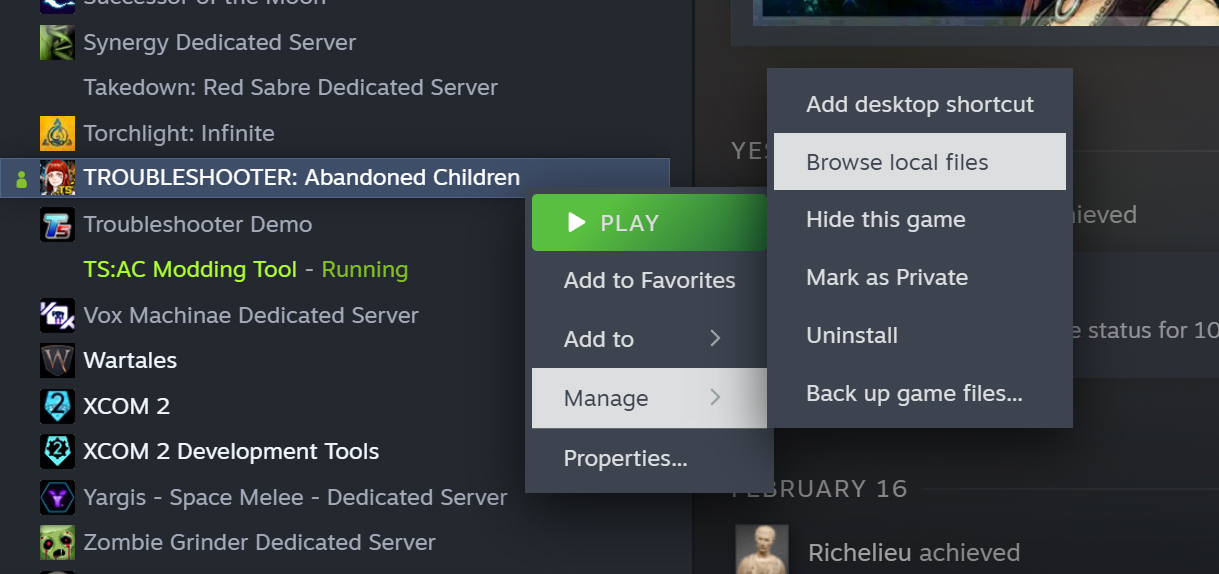
- You can check the game installation path by right-clicking on the game in your Library list and selecting "Manage" → "Browse Local Files."
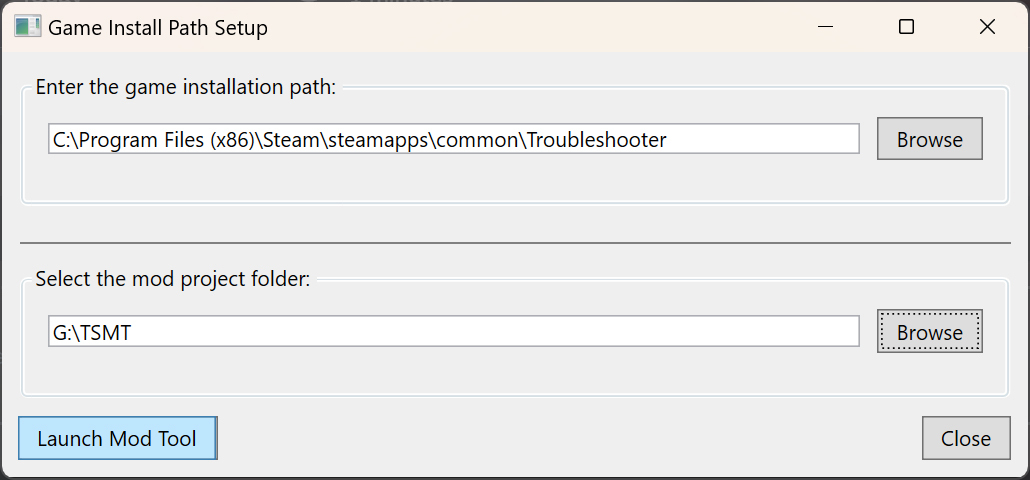
- In the Mod Project Path section at the bottom, specify the folder where the currently mod data will be managed.
- Once the installation is complete, play TS: AC Modding Tool.
2. TS: AC Modding Tool User Manual
1. Initial Screen
When you run TS: AC Modding Tool, you can see the following initial screen.

The data that can be modified using the "TS: AC Modding Tool" are as follows.
- Monster Editor
- You can modify the monster's level, mastery, equipment, and rewards.
2. Monster Editor
You can modify a monster's mastery board, equipment, and rewards using the "Monster Editor."
(1) Monster Editor Screen
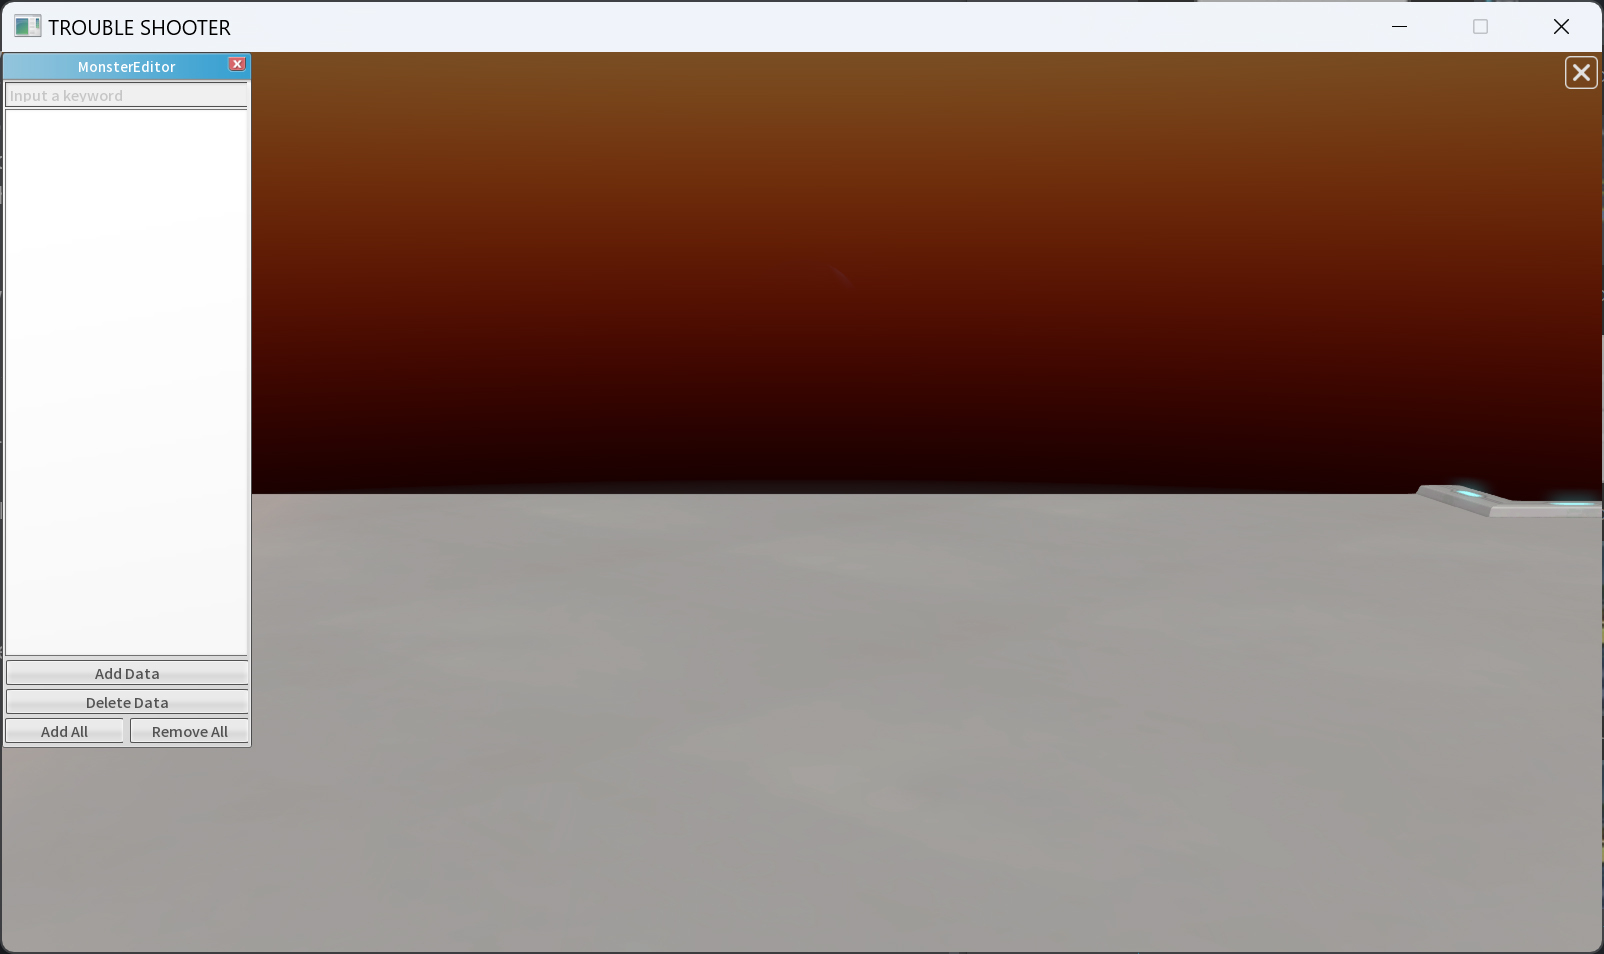
The window in the top left displays the list of monster data currently available for editing. To modify monster information, you need to click the "Add Data" button at the bottom of that window to add a monster for editing.
- Add Data
- You can add the monster data to be edited to the list.
You register the monster data by clicking "Add Data."
(2) Monster List
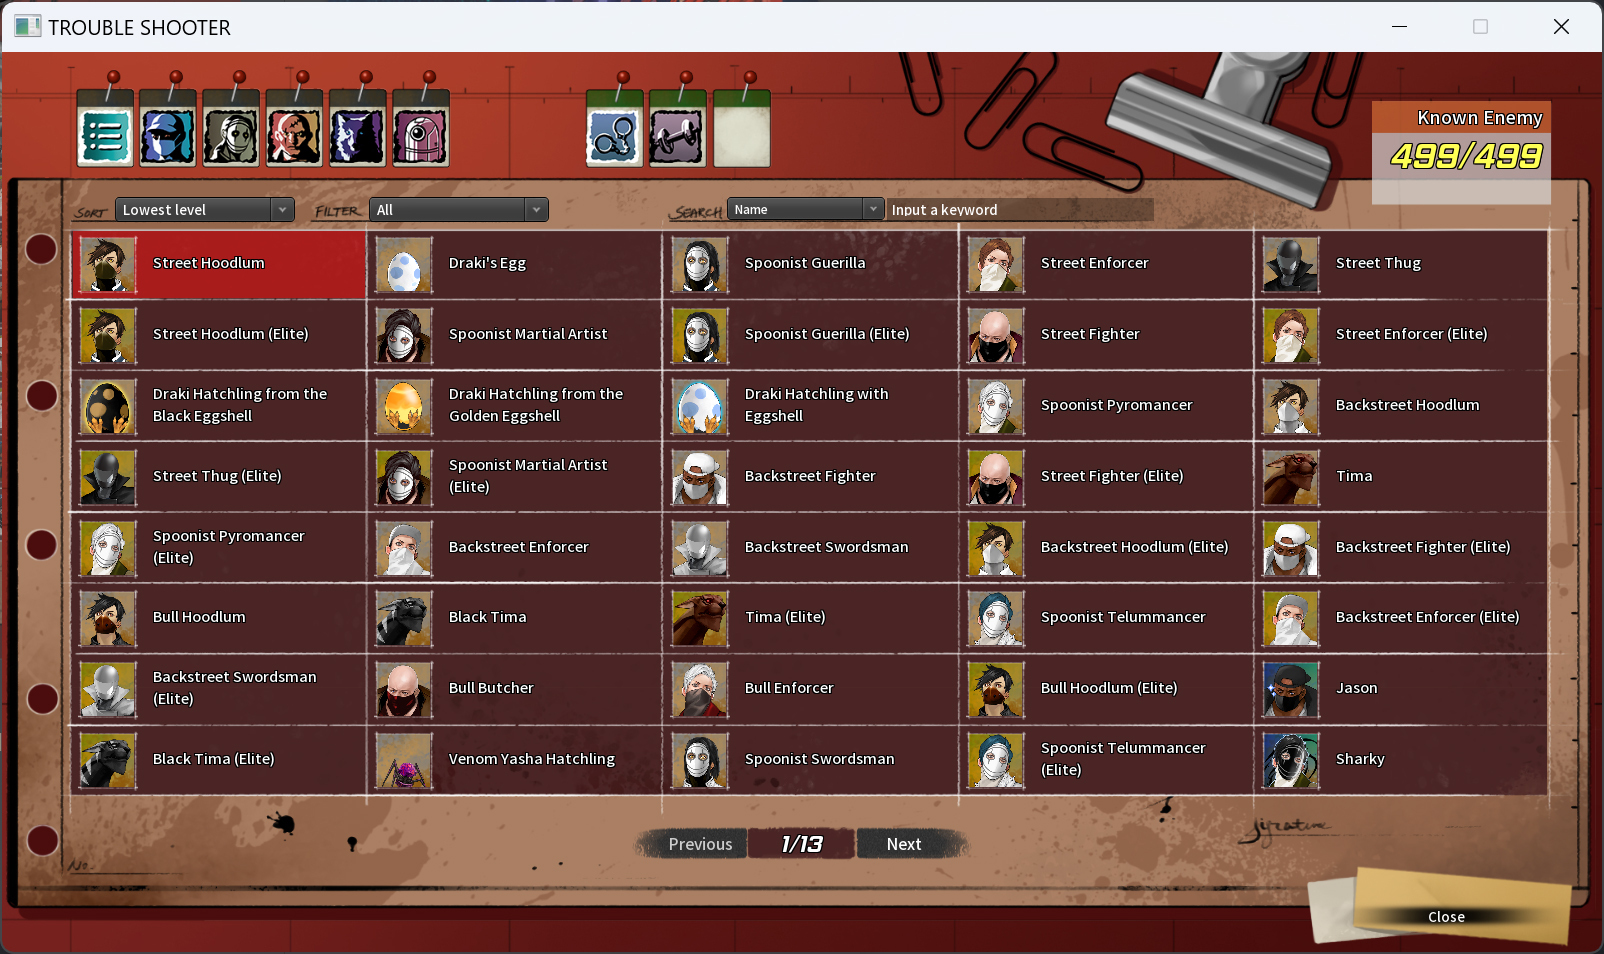
When you click the "Add Data" button, the familiar "Troublemaker List" screen will appear. From this list, select the monster you want to edit.
I select "Street Hoodlum" for editing.
(3) Monster Editor Screen - Selected Monster data
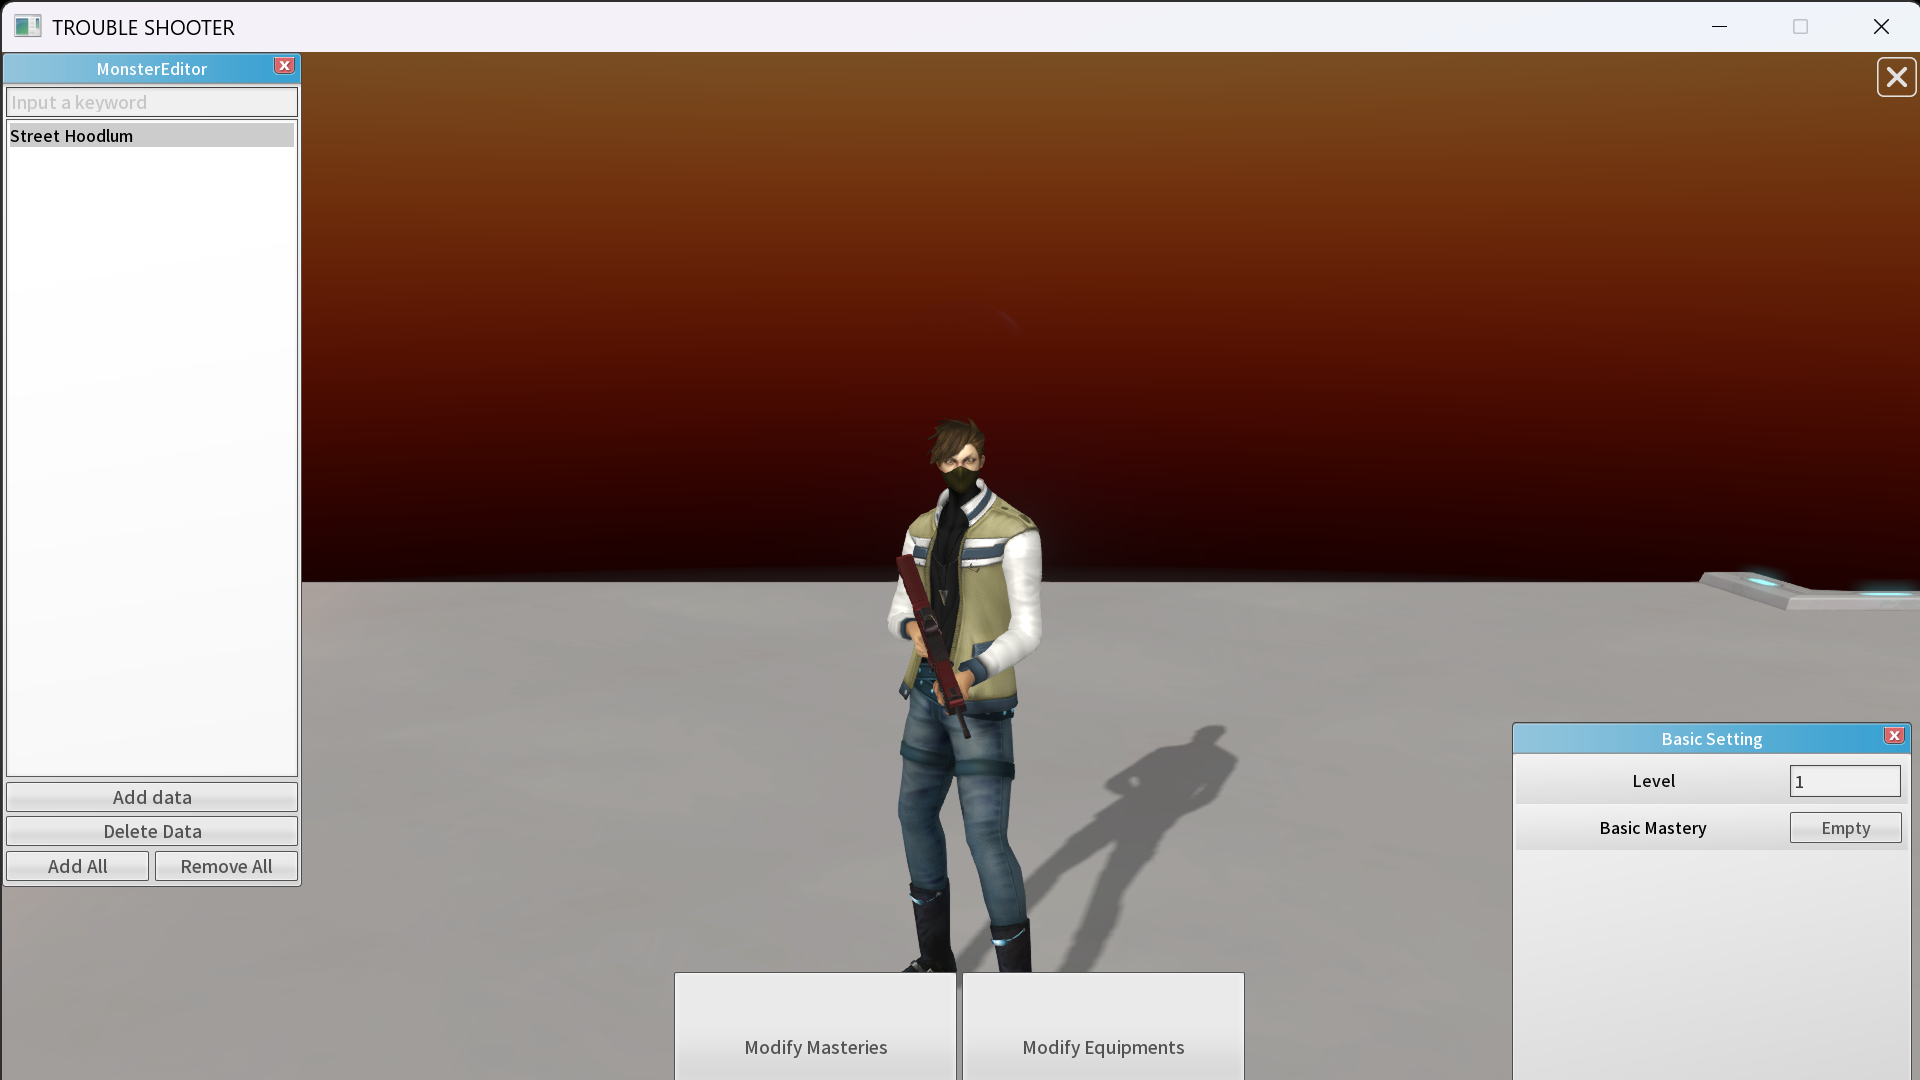
"Street Hoodlum" is registered in the "MonsterEditor" list window and automatically selected.
In the center of the screen, the character model of "Street Hoodlum" appears, and at the bottom center, the "Modify Masteries" and "Modify Equipments" buttons are activated.
Additionally, in the bottom right window, the level and unique mastery of the currently selected character can be modified directly.
- Modify Masteries
- You can modify the current monster's mastery.
I click "Modify Masteries" for editing masteries.
(4) Mastery Board Screen
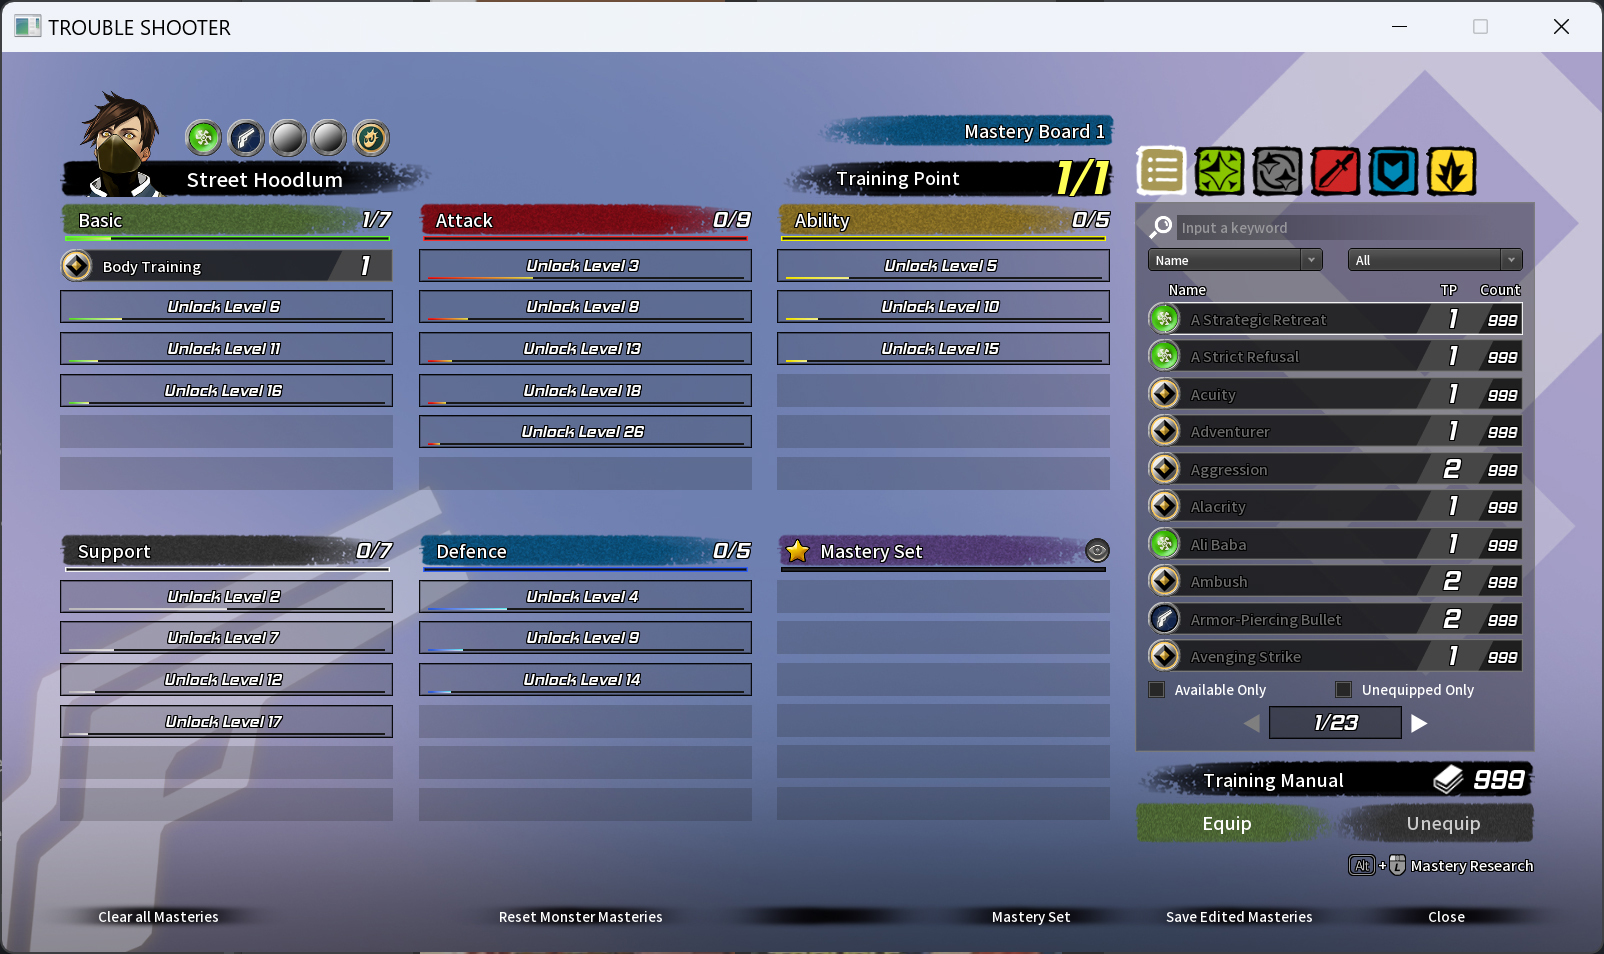
When you click the "Modify Masteries" button, the familiar "Mastery Board" screen appears.
After freely configuring the desired mastery board, press the "Save Mastery Board" button at the bottom right to save the data.
If you leave the Mastery Board screen without saving and select another monster from the list, the modified data will disappear. Please keep this in mind.
- Clear all Masteries
- You can remove all masteries from the current mastery board.
Now that we have modified the Mastery Board, let's go back to the previous screen and press the "Modify Equipments" button.
(5) Equipments Screen
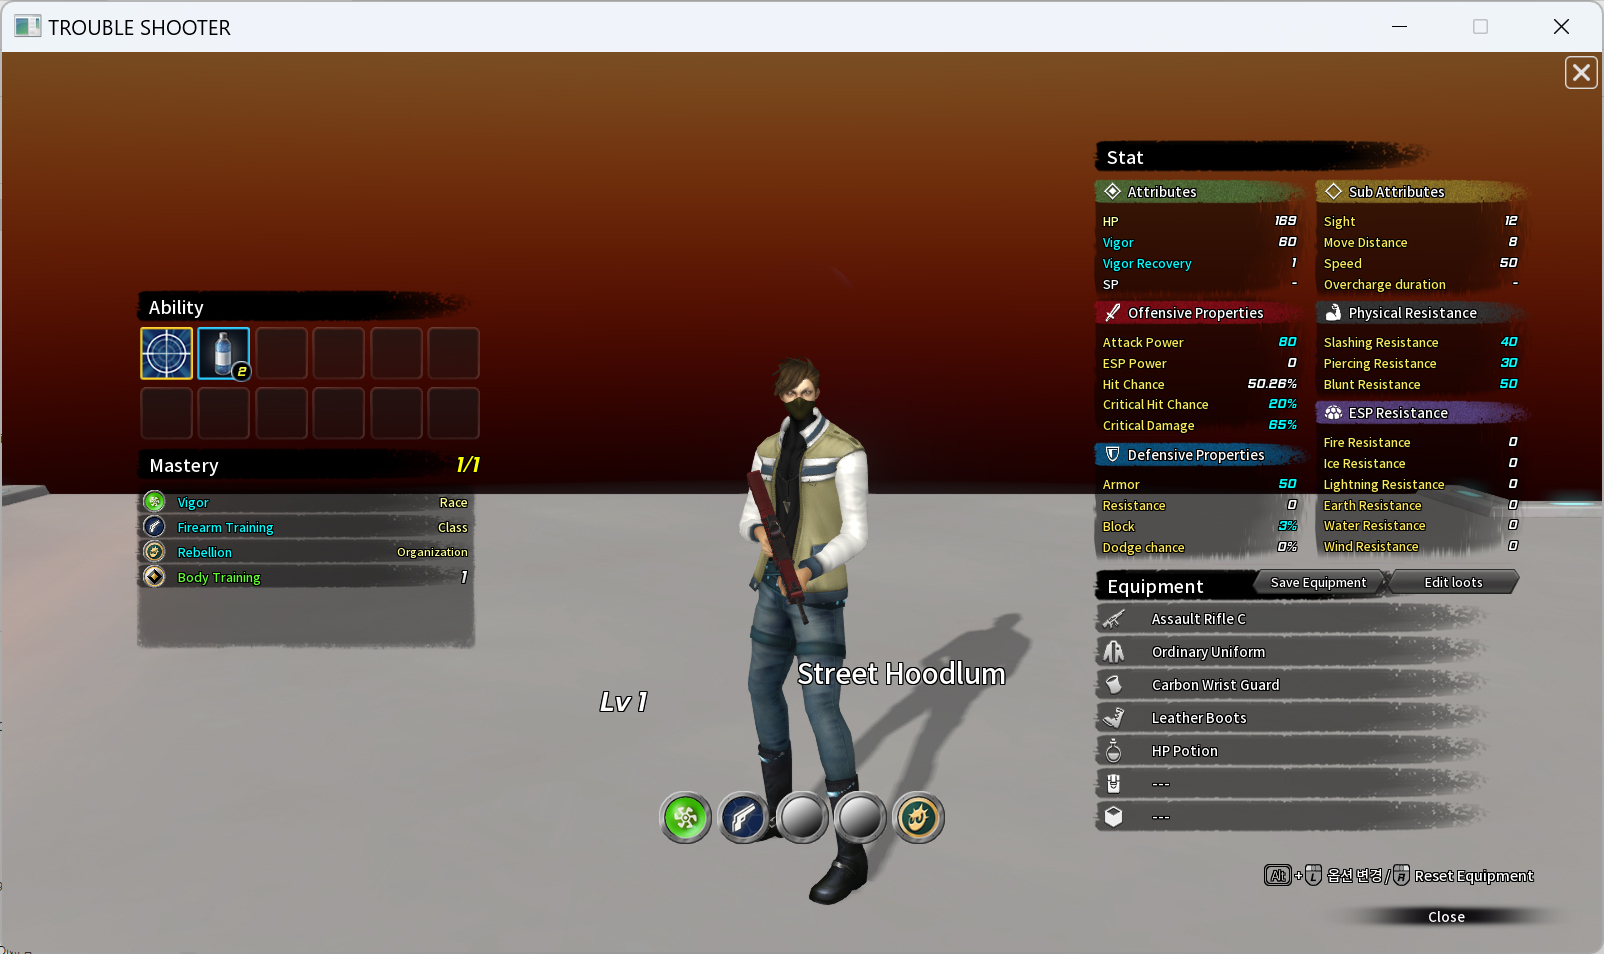
When you click the "Modify Equipments" button, the familiar "Equipment" screen appears.
After equipping the desired equipments freely, press the "Save Equipment" button at the top right of the "Equipment" window to save the data.
If you leave the Equipment screen without saving and select another monster from the list, the modified data will be discarded. Please keep this in mind.
- Save Equipment
- You can save the current Equipments.
Now that we have modified the Equipment, let's press the "Modify Loot" button for editing Loot.
(6) Loot list window
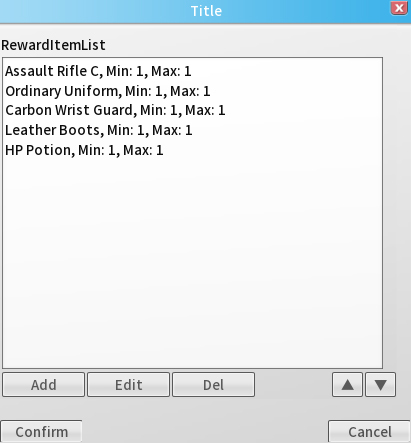
When you click the "Modify Loot" button, the "Loot list" window appears.
The five items listed on the current screen are Street Hoodlum's loot list. The Min value represents the minimum quantity obtained when acquiring the loot, while the Max value represents the maximum quantity.
You can add items to the list using the "Add" button and remove them using the "Del" button. Additionally, you can edit a selected item by clicking the "Edit" button or by double-clicking the item in the list.
I double-click the topmost item, Assult Rifle C.
(7) Loot details window

When you double-click the item on the Loot list, the "Loot details" window appears.
You can modify the loot item, minimum acquisition quantity, and maximum acquisition quantity. However, the loot acquisition probability is automatically adjusted based on the number, grade, and type of loot.
Loot data modifications are applied immediately without a save button, so please be careful.
- Item
- You can change the loot item.
3. Mastery Editor
You can modify masteries using the "Mastery Editor."
(1) Mastery Editor Screen
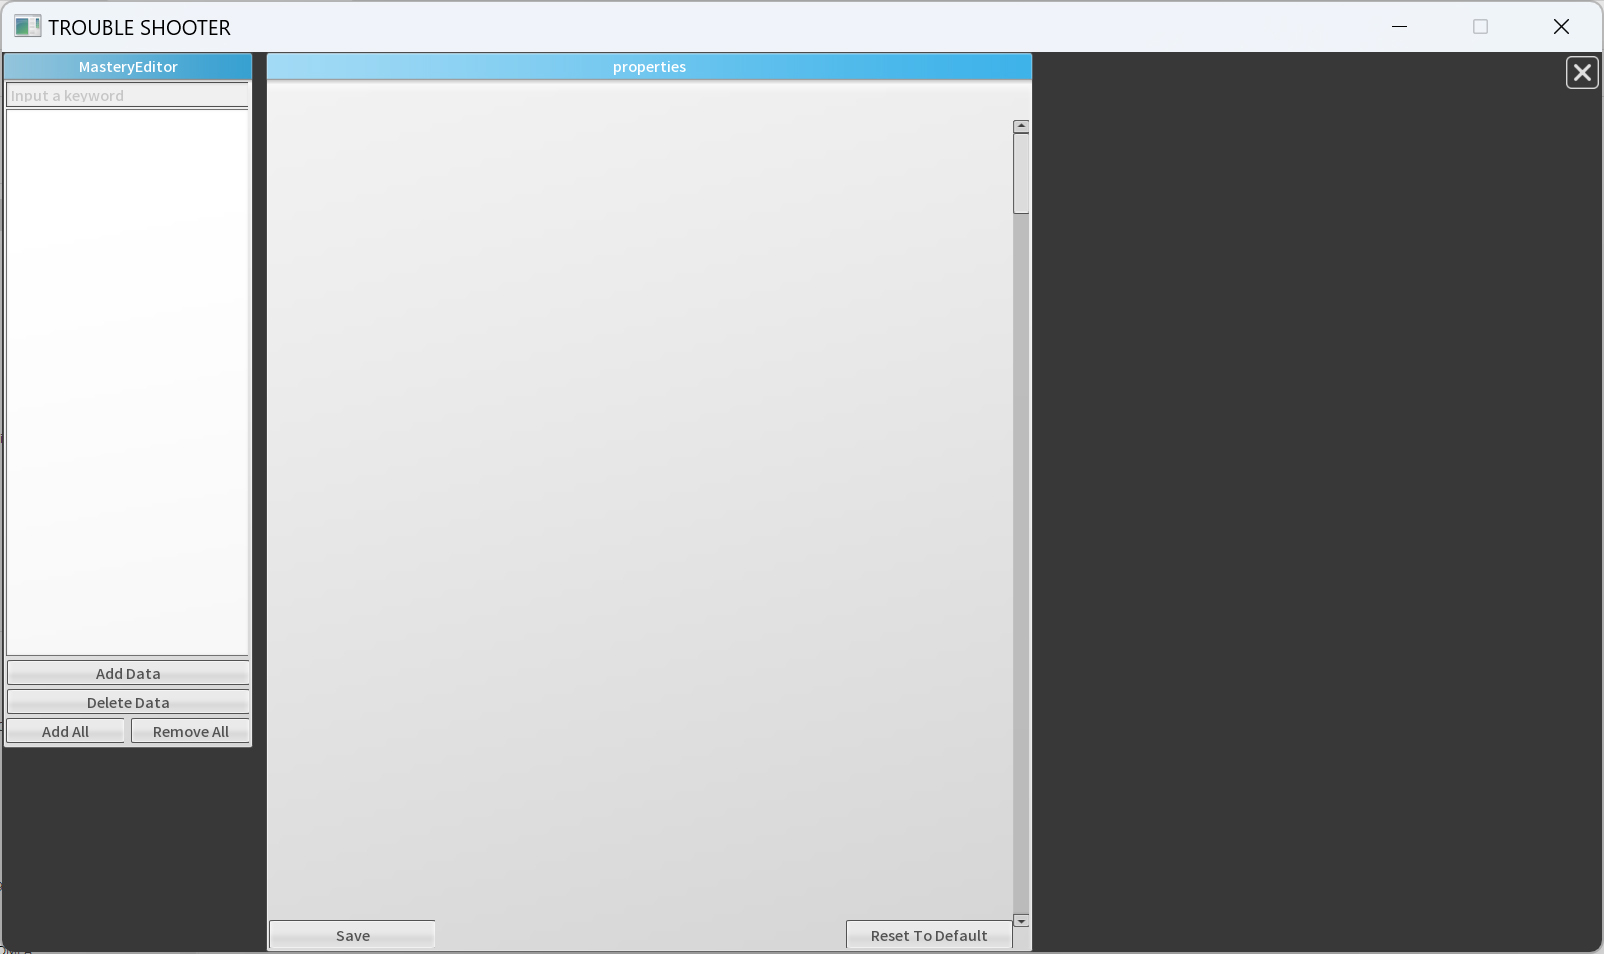
The window in the top left displays the list of mastery data currently available for editing. To modify mastery information, you need to click the "Add Data" button at the bottom of that window to add a mastery for editing.
- Add Data
- You can add the mastery data to be edited to the list.
You register the mastery data by clicking "Add Data"
(2) Mastery List
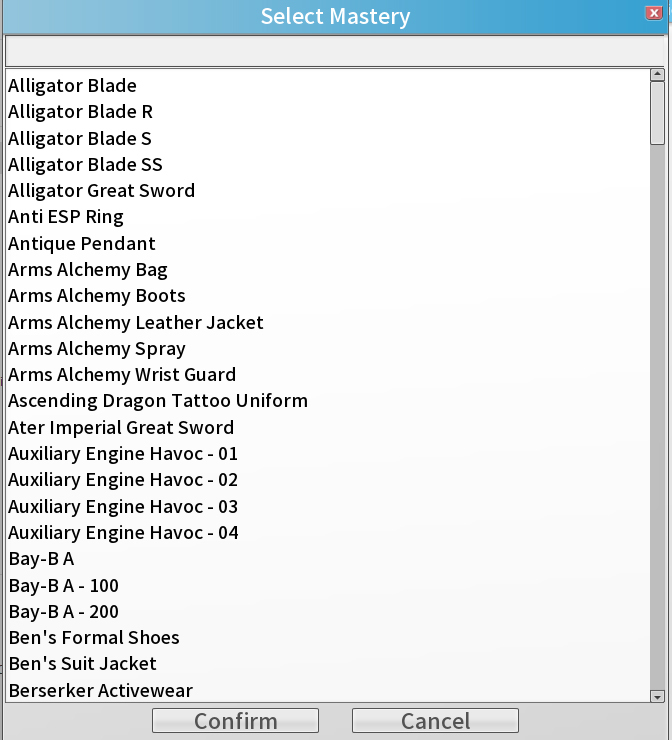
If you search for a mastery name at the top, you can easily find the desired mastery. Masteries that are already registered in the list will be excluded from the list.
I select "Extreme Speed" for editing.
(3) Mastery Editor - Exteme Speed
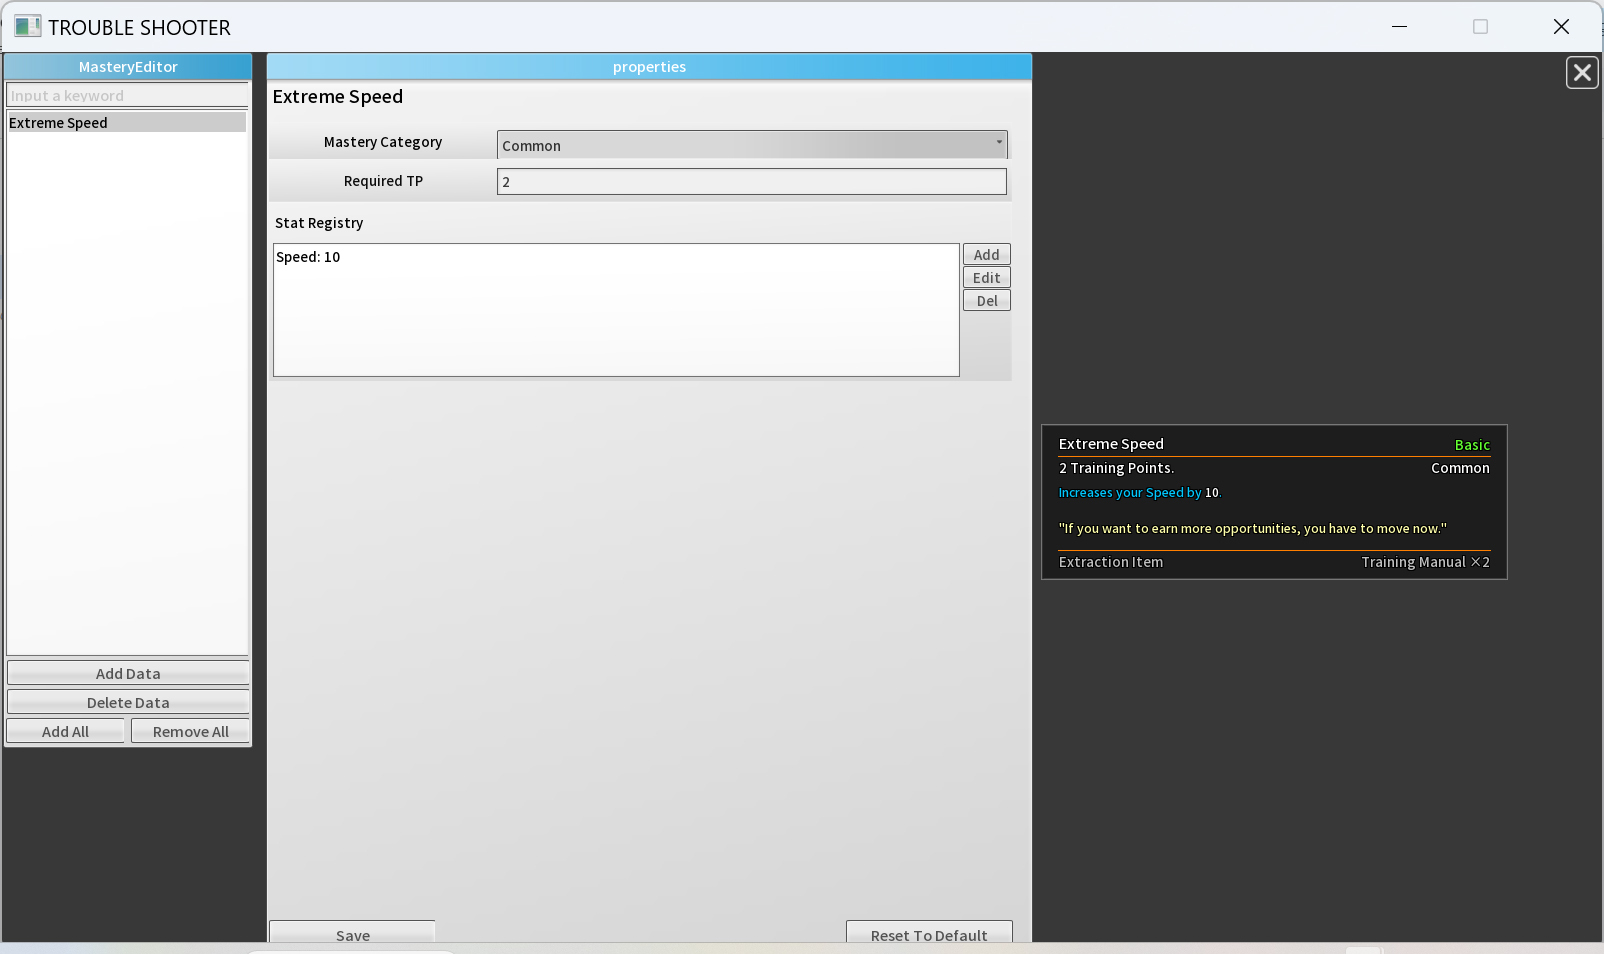
The central panel displays the editable information for the currently selected "Extreme Speed" mastery, while the right side shows the tooltip reflecting the applied modifications.
- Mastery Category
- You can set the mastery category
I select the "Concealment" mastery, which has a slightly different type of data.
(4) Mastery Editor - Concealment
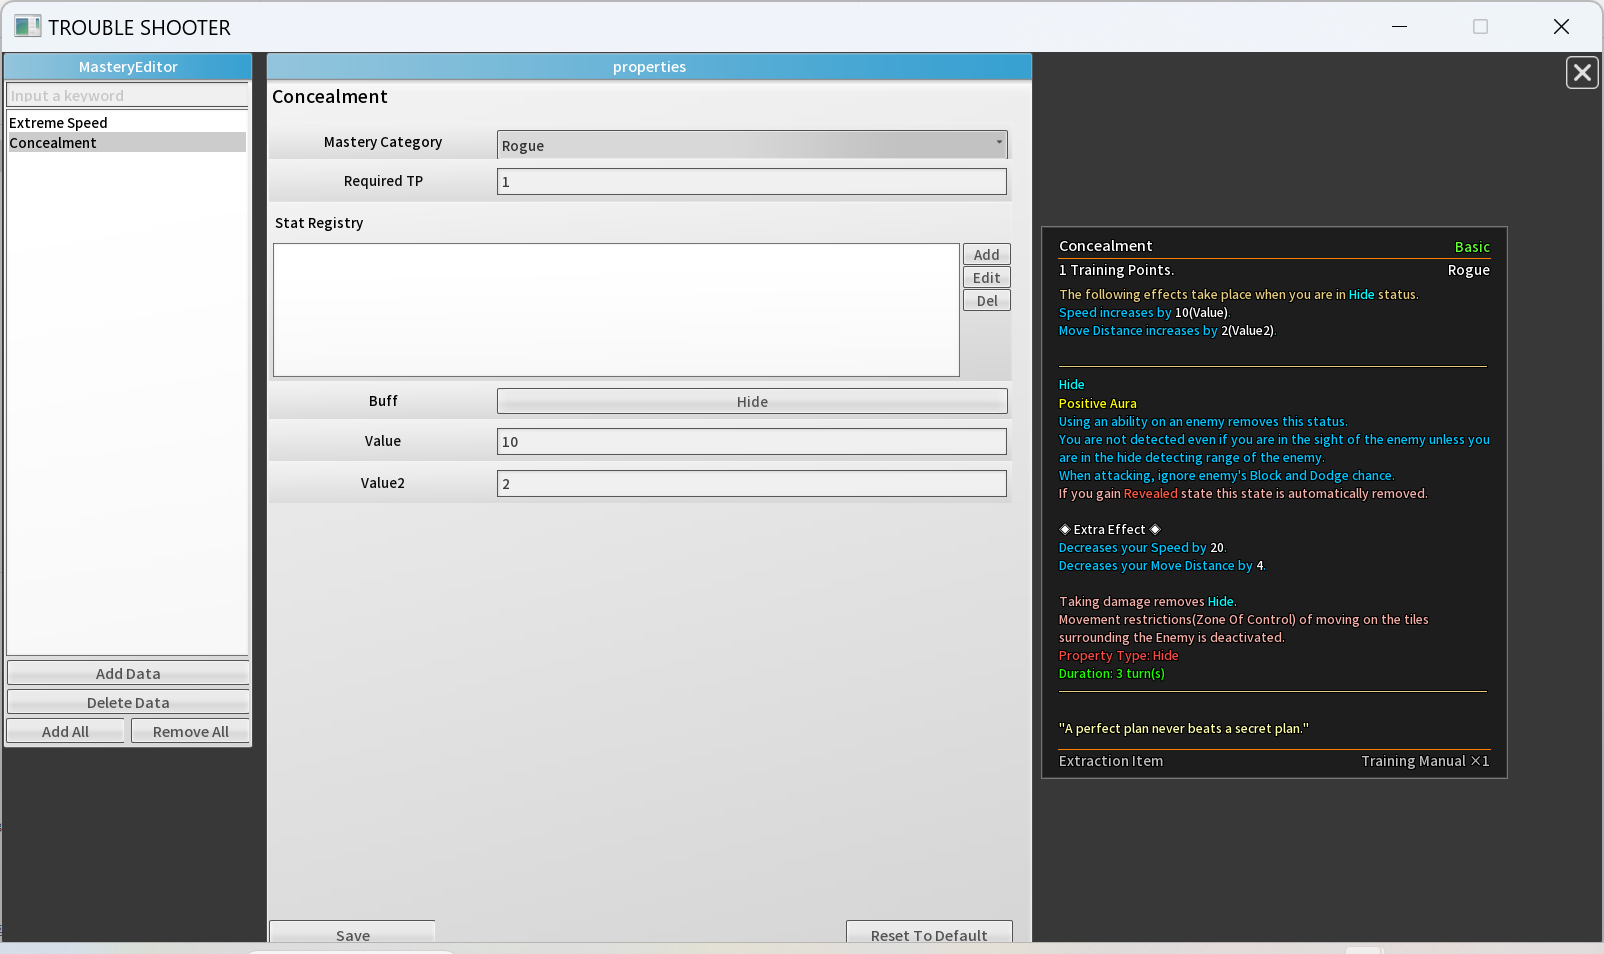
Looking at the information in the central panel, you can see that "Concealment" has three additional fields—Buff, Value, and Value2—unlike "Extreme Speed".
Additionally, in the tooltip on the right, you can see numerical values labeled as (Value) and (Value2). The values in the central panel are directly linked to these tooltip values.
- Mastery Category
- You can set the mastery category
In addition, each mastery has its own unique modifiable values, such as BuffGroup, Subbuff, and Ability. You can find where these values are linked by checking the changes in the tooltip on the right.
4. Equipment Editor
Since the initial screen is the same as "Mastery Editor", we will skip its explanation and move on to describing the values of the "Black Peral Team Sneakers".
(1) Equipment Editor - Black Peral Team Sneakers
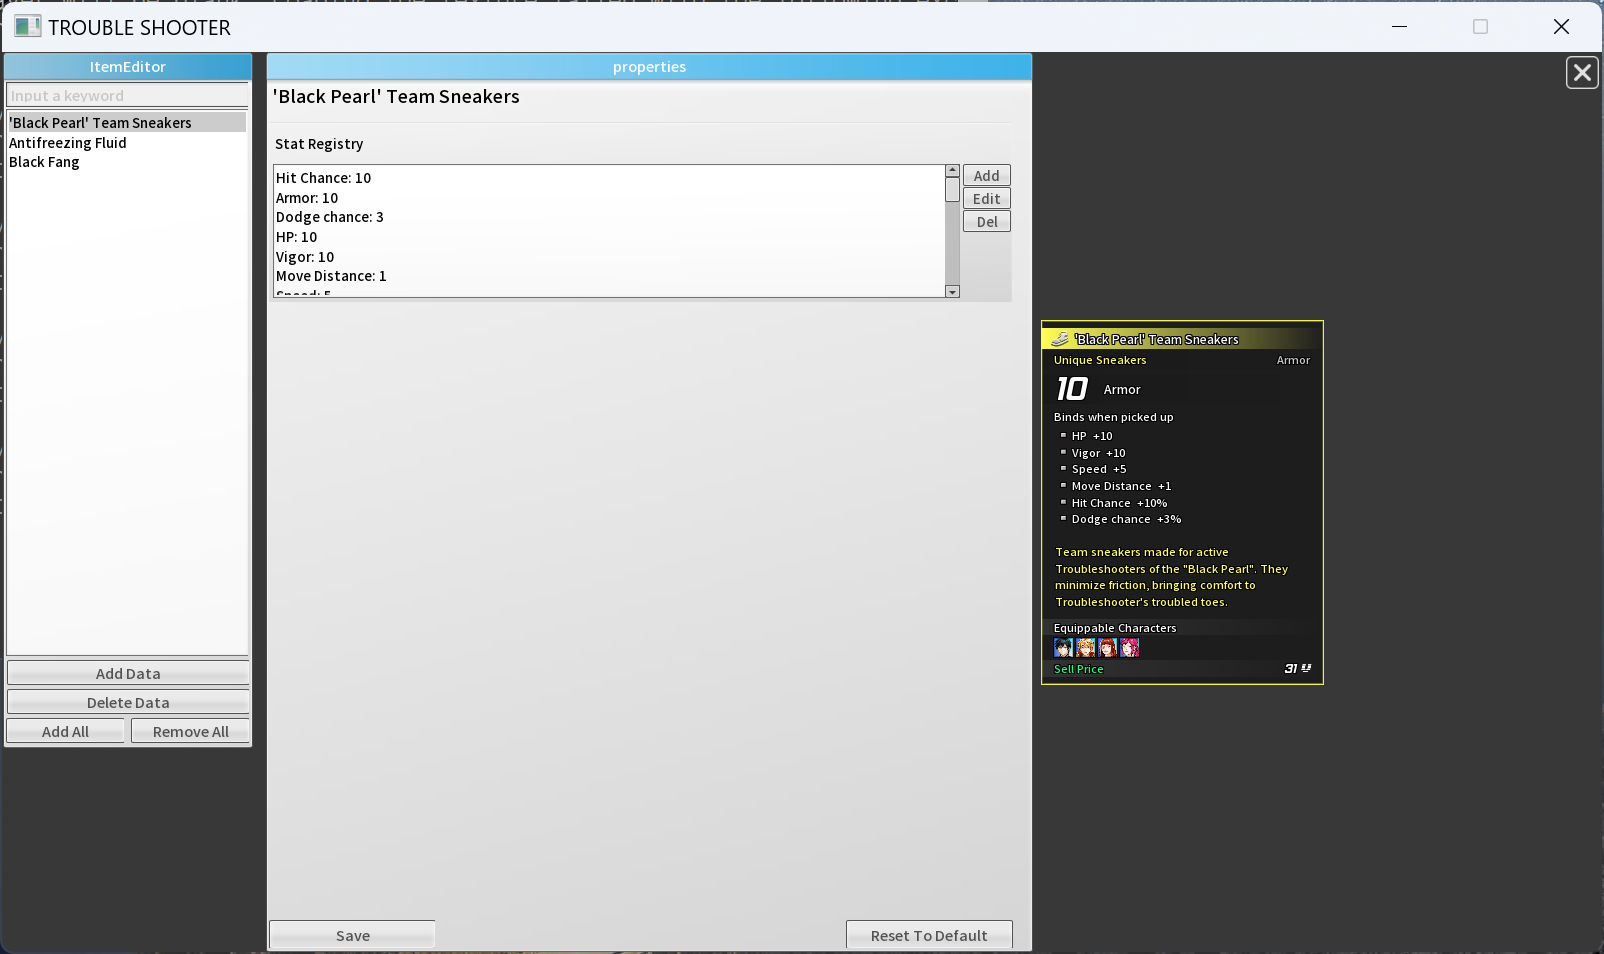
You can add, delete, or edit the stats in the Stat Registry to customize items with your desired values.
5. Ability Editor
Since the initial screen is the same as "Mastery Editor", we will skip its explanation and move on to describing the values of the "Wind Slash" ability.
(1) Ability Editor - Wind Slash

Just like in the Mastery Editor Screen, the selected ability's attribute values are displayed in the center, while the tooltip appears on the right.
Below is an explanation of the values in the central information panel.
- Base Damage
- You can set the base damage of the ability.
6. Buff Editor
The explanation for data registration is the same as in other editors, so let's skip it and go straight to the buff values that can be set.
(1) Buff Editor - Hero
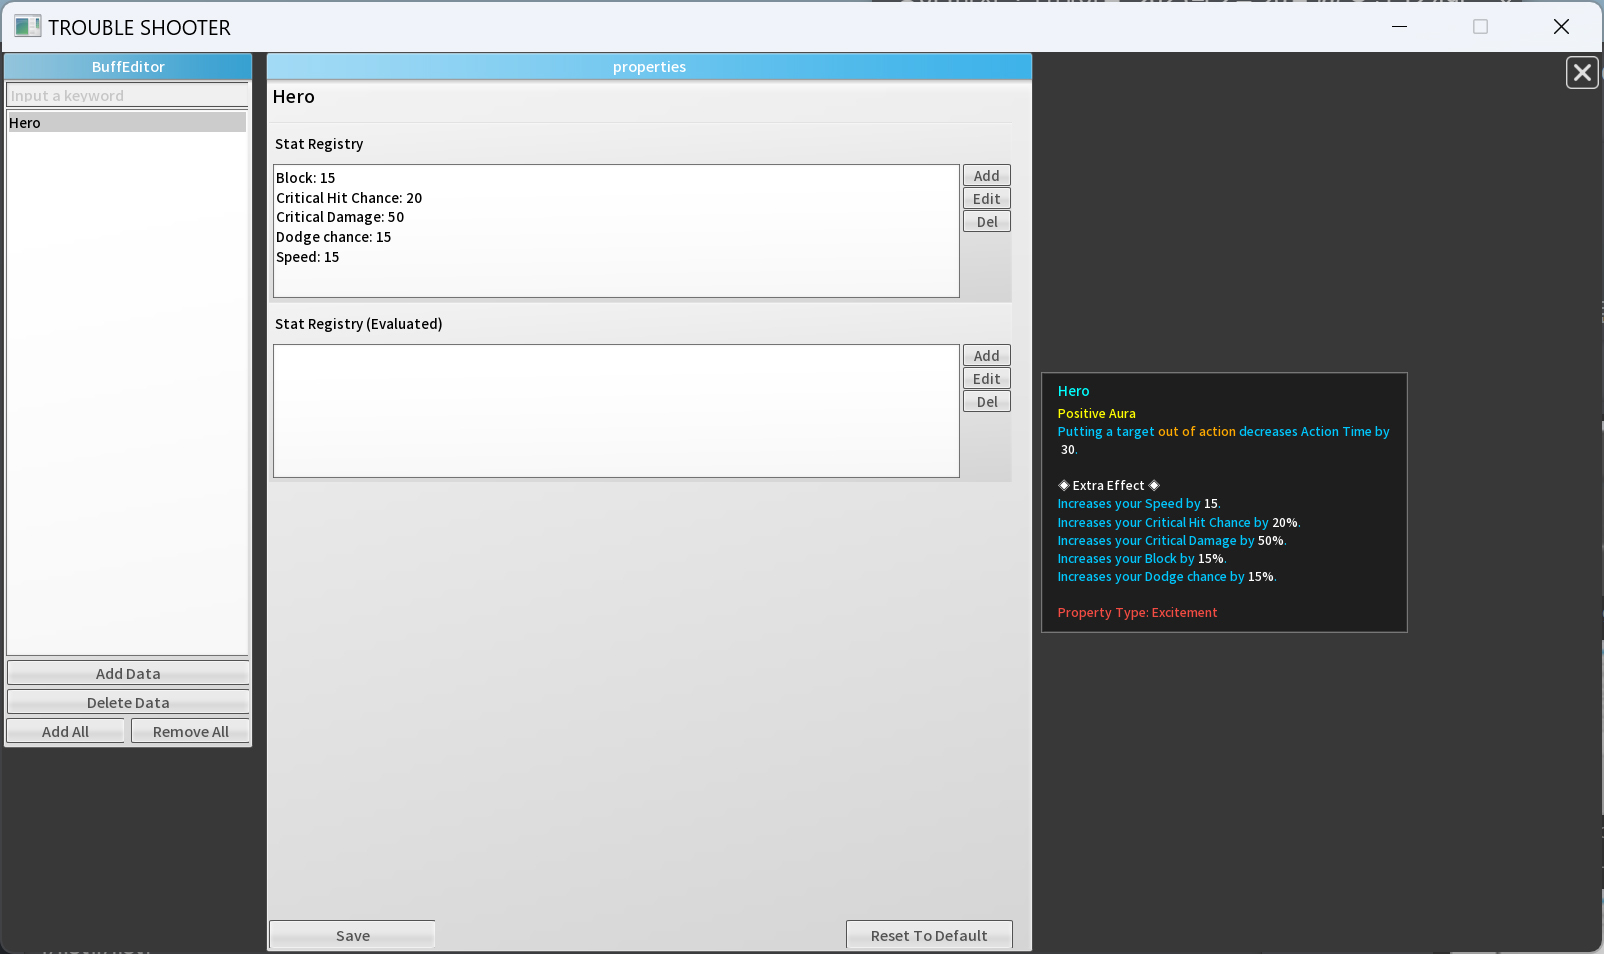
Since buffs are mostly stat-related information, you can register the desired stat values in the Stat Registry.
(2) Buff Editor - Concentrated Magic Power
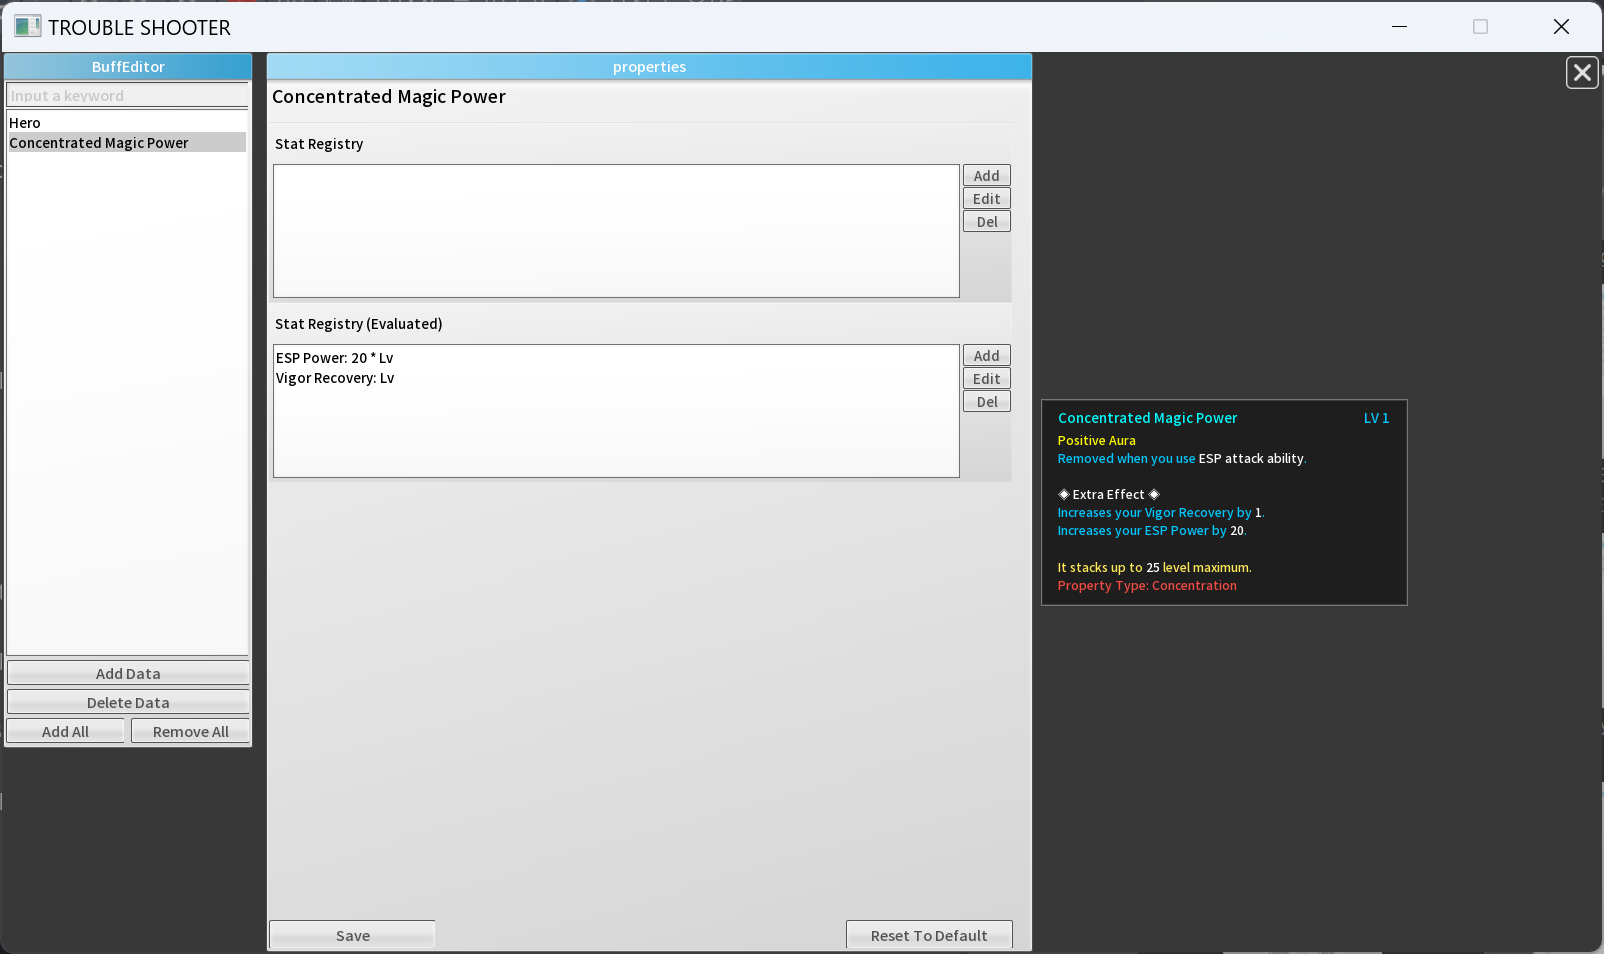
"Stat Registry (Evaluated)" is where you register the calculated values of a buff's stat that change based on level.
7. Language & Dictionary Setting
If you want to add a translation in a different style or include a new language, you can use "Language & Dictionary Setting" to create your own custom translation.

- Language Key
- You can set the key value for the newly added custom language.
After specifying the appropriate settings for the translation you want to add, click "Save Setting" below to apply your custom language. And you can check the generated translation file by clicking the "Open Dictionary Folder" button.
8. Upload Mod
Now, let's upload the modded data to the Workshop.
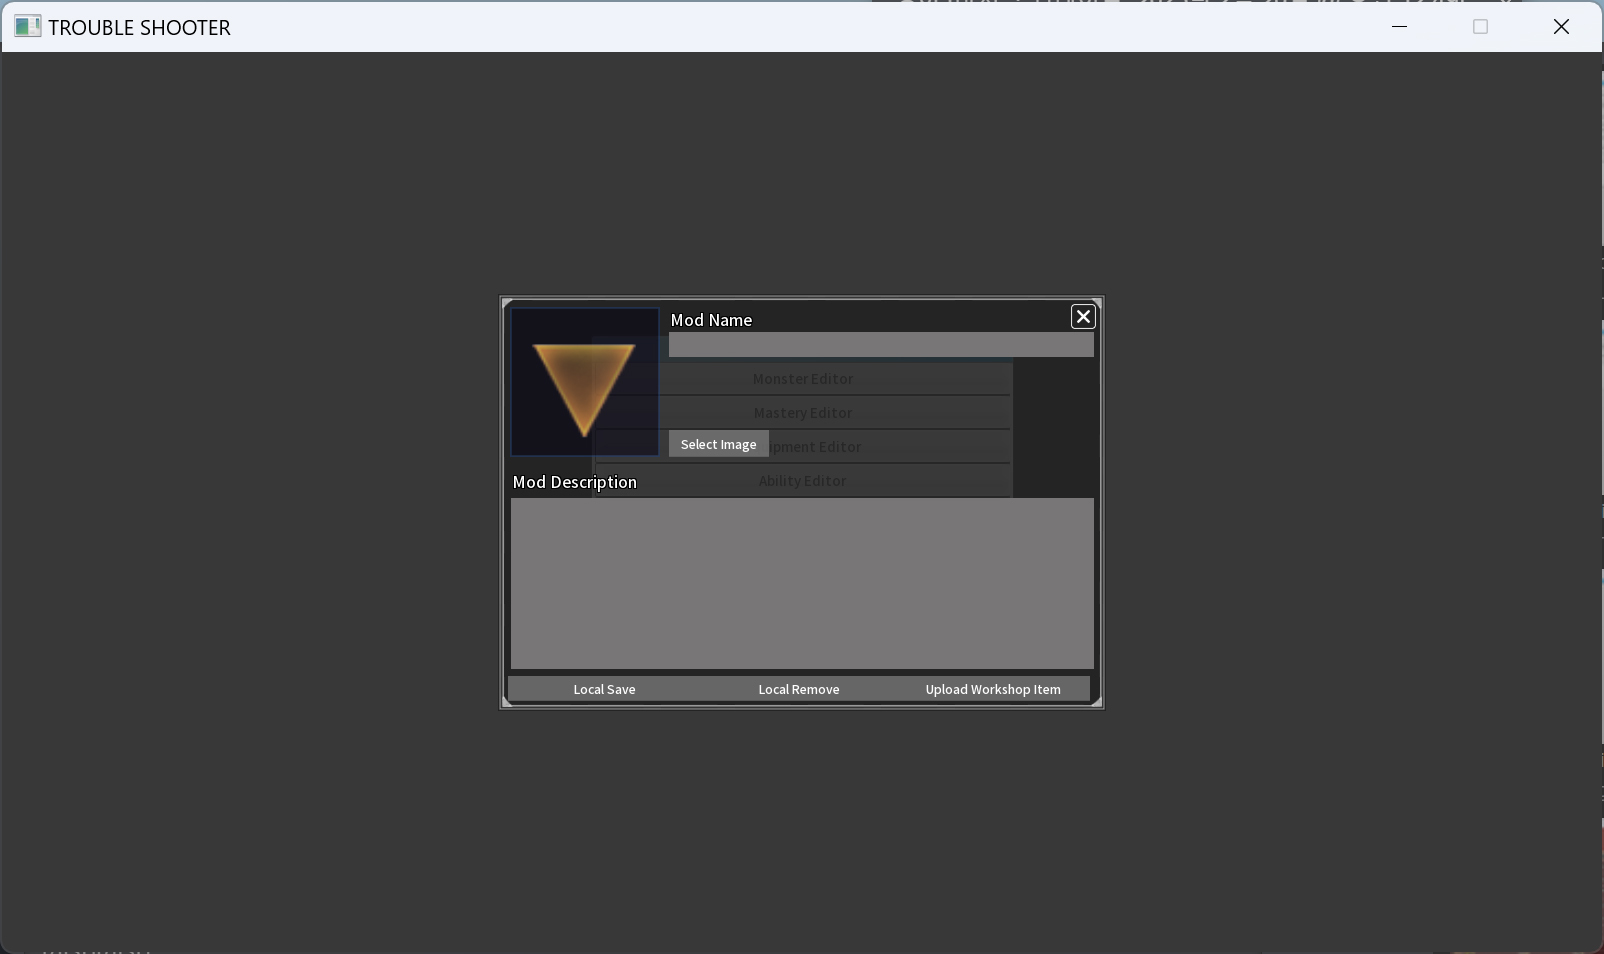
Enter the name of your mod in "Mod Name," and add a representative image by clicking the "Select Image" button. Then, write a description of your mod in "Mod Description.
Once you have completed all the information about your mod, click "Local Save" to apply the mod to your client and check it before uploading it to the Workshop. If the mod is currently applied, you can disable the modded data by clicking the "Local Remove" button.
Once everything is complete, click the "Upload Workshop Item" button to upload your mod data to the Workshop.
3. Wrapping Up the Guide...
If you ever run into issues with the features covered in this guide or have any usability concerns, we’ll do our best to improve them in future updates whenever possible.
For any related issues, feel free to post in the "Workshop" thread under the discussions section—we're always happy to help however we can!
Happy modding, and have fun!